1.Quick and Easy Registration #
We’re happy to help you get started! When registering your device for the first time, you’ll automatically be assigned the Administrator role—this gives you full access to set up and manage your system with ease.
Note: The user role for the first registration of the device is administrator.
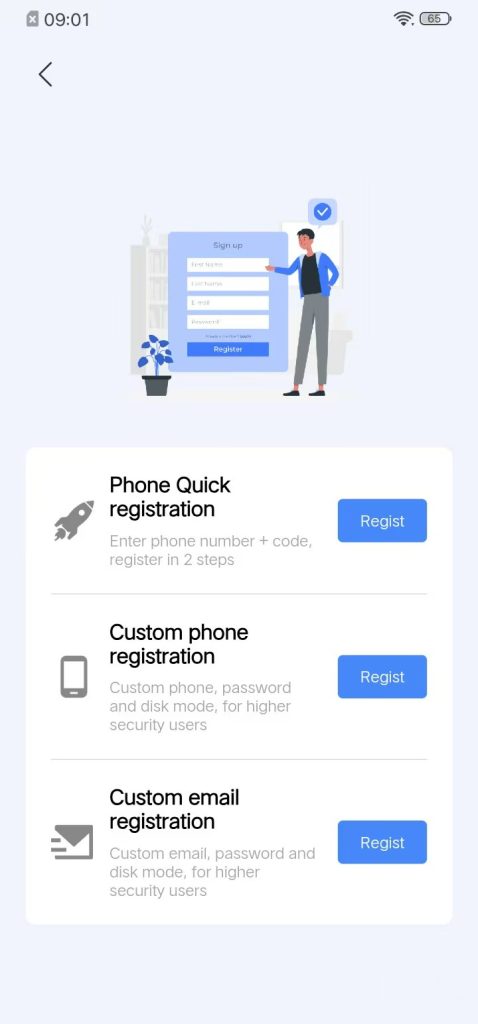
Enter phone number+ coderegister in 2 steps
- Before You Begin:
- To ensure a smooth setup experience, please make sure of the following:
- 1. Your device is powered on, connected to the internet, and has a hard drive properly installed.
- 2. Your mobile phone is connected to the same local network as the device.
Step 1:Locate Your Device on the Network #
When you power on the device, you’ll notice the status or disk light slowly blinking red—this means it’s ready.
Now, open the companion app and tap “New Device Registration” to begin the setup process.

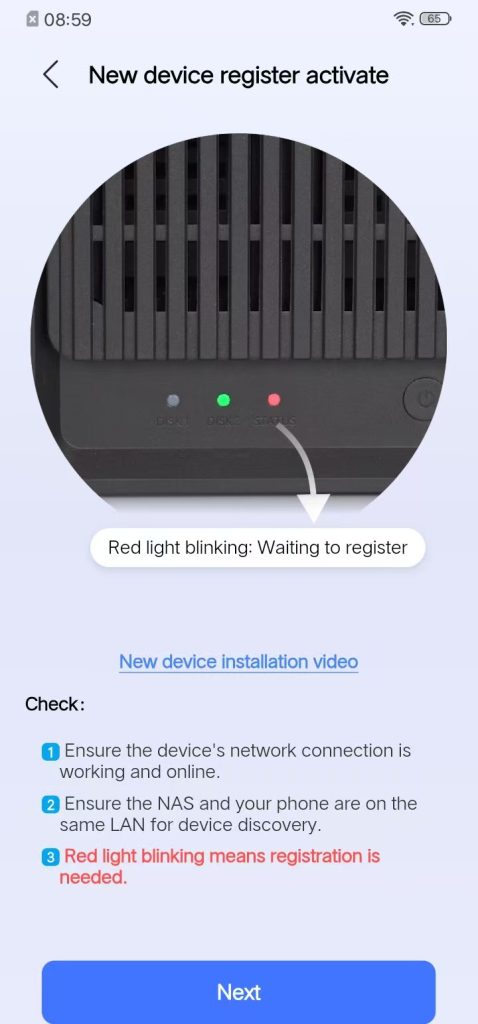
Click “Next” to enter “The following devices are discovered “

Note: Multiple devices are present on the local area network; please select the device that has not yet been registered.
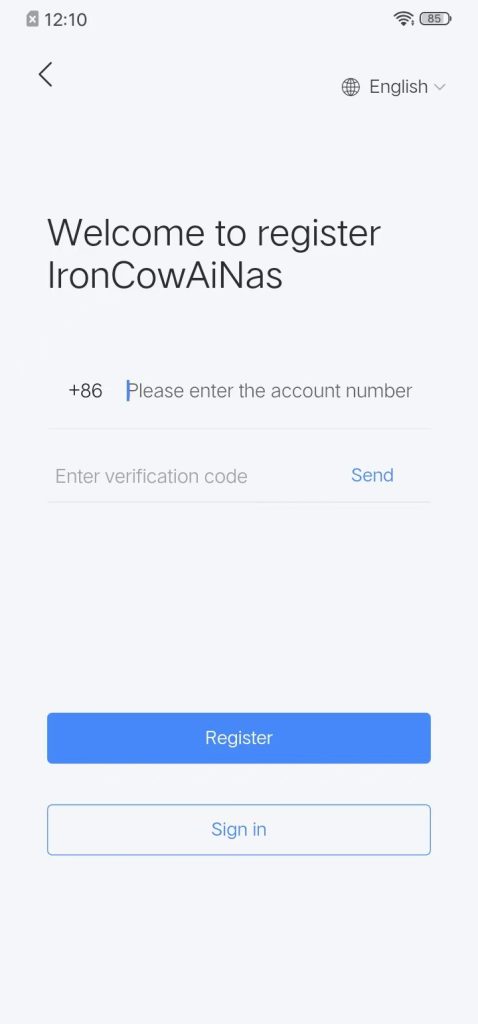
Step 2: Complete registration quickly using a mobile device (This step can also be performed using email, with the same procedure)
Click “Quick Registration via Mobile Phone”
Enter the verification code and click “Register”. Upon successful registration, you will be automatically directed to the “Hard Disk Configuration” page.
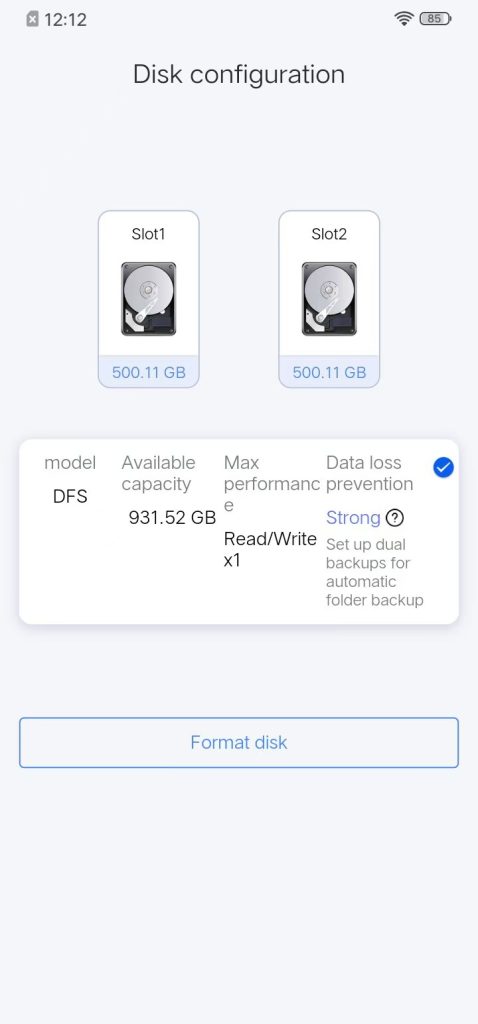
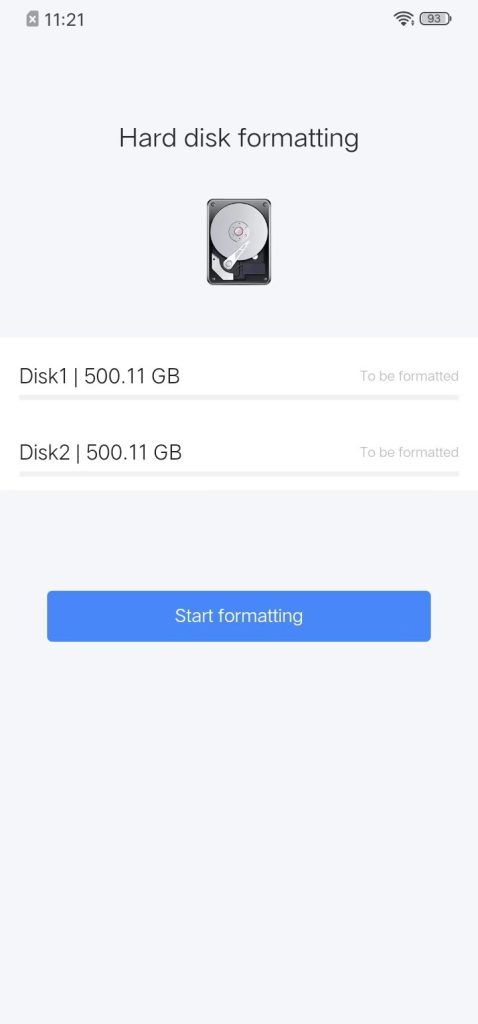
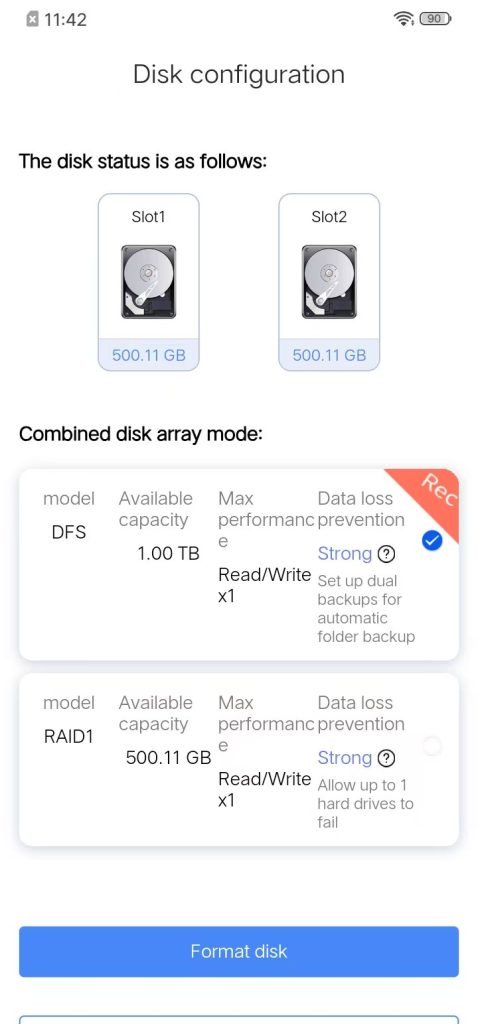
Step 3: Create a storage pool #
Instructions:
Basic mode: Users only insert one hard drive, this mode will be used by default, and this mode does not support dual backup. Hard drive damage will result in the loss of all data on the hard drive. The actual available capacity is 100% available hard disk space.
Raid1 mode: Two hard drives of the same capacity need to be inserted, and the two hard drives are mirror images of each other to save identical data in real-time. The actual available capacity is only the size of a single hard drive (e.g. 2 × 4TB hard drive → total capacity 4TB)
DFS mode: Two hard drives need to be inserted, with varying capacities. DFS explanation: Users can set up “dual backup” for important directories in the app themselves. Only double backup the directory set by the user. Compared to Raid1 mode, DFS’s full dual backup not only meets the security requirements of important data, but also maximizes hard drive utilization.
The default storage pool mode for a single drive is Basic mode
When using dual disks, the storage pool mode can only select DFS mode and cannot select RAID1 mode
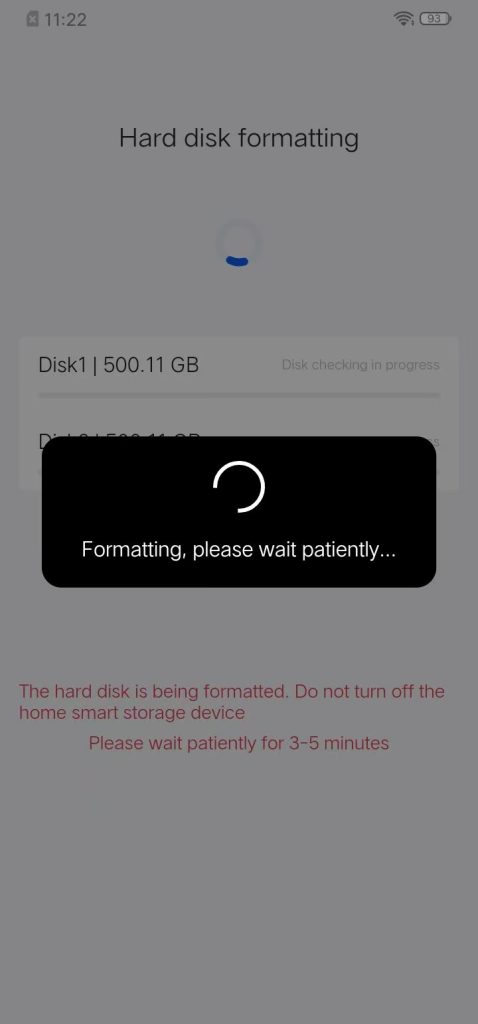
Step 4: Format the hard disk #
Click “Next”, “Formatting in progress…”

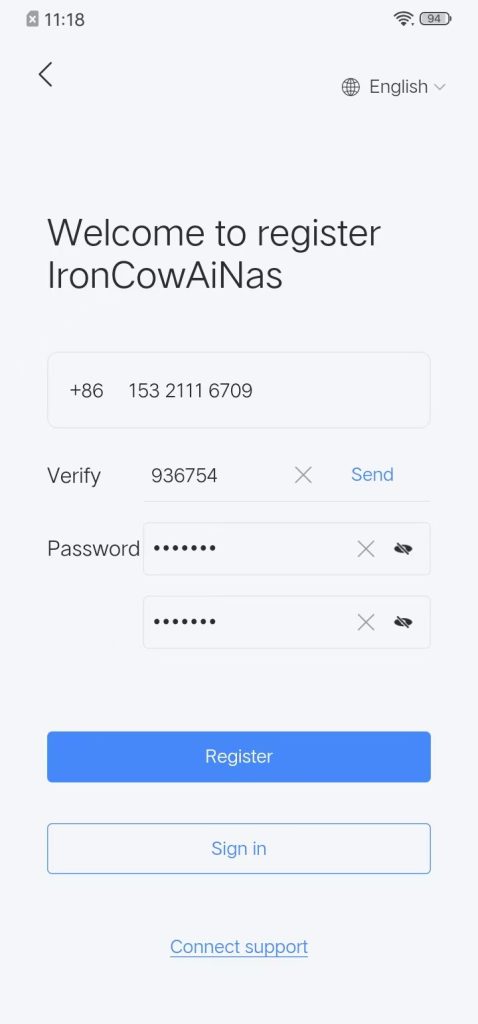
2. Customized Mobile Phone Registration #
Note: The user role for the first registration of the device is administrator.
Custom phone, password and disk mode, for highersecurity users
- Before You Begin:
- To ensure a smooth setup experience, please make sure of the following:
- 1. Your device is powered on, connected to the internet, and has a hard drive properly installed.
- 2. Your mobile phone is connected to the same local network as the device.
Step 1: Discover the Device on the Local Area Network
Device Status: After powering on the device (the status indicator or disk light is slowly blinking red), launch the application and select “New Device Registration.”


Click “Next” to enter “The following devices are discovered”.

Note: Multiple devices are present on the local area network; please select the device that has not yet been registered.
Step 2: Customized Mobile Phone Registration
Click “Customize Mobile Phone Registration”

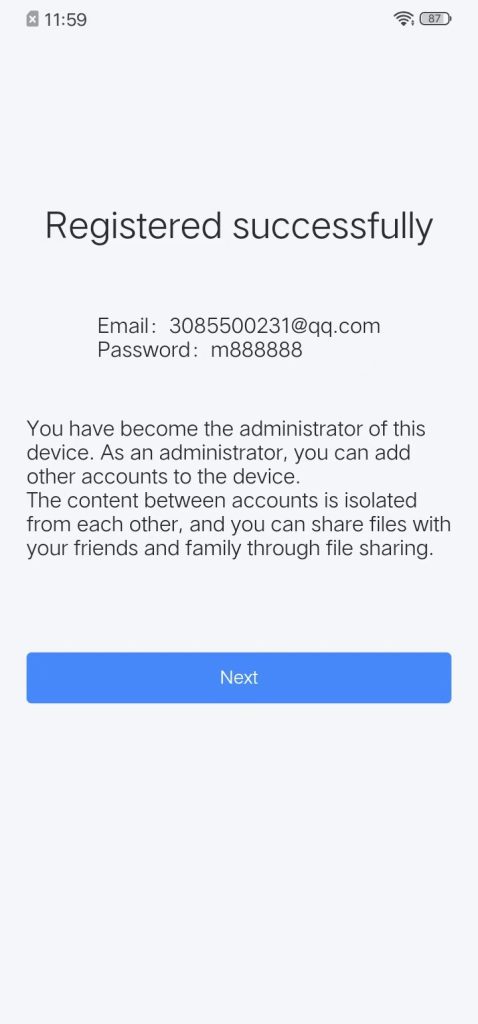
After filling in the mobile phone number, verification code and password, click “Register”. A prompt of “Registration successful” will appear. The new device administrator registration is successful. The next step is to enter the main interface of the APP application.
Step 3: Create a storage pool #
Description:
Basic Mode: Users insert only one hard drive and this mode is the default. It does not support dual backup. If the hard drive fails, all data on it will be lost. The actual available capacity is 100% of the hard drive space.
Raid1 Mode: Requires two hard drives of the same capacity to be inserted. The two hard drives are mirrored and store exactly the same data in real time. The actual available capacity is only the size of a single hard drive (e.g., 2×4TB hard drives → total capacity 4TB).
DFS Mode: Requires two hard drives to be inserted, and their capacities can be different. DFS Explanation: Users can set “dual backup” for important directories in the APP. Only the directories set by the user for dual backup will be backed up. Compared to the full dual backup of Raid1 mode, DFS not only meets the security requirements for important data but also maximizes the utilization rate of hard drives.

Step 4: Format the hard disk #
Click “Start Formatting” to pop up the “Password Box”
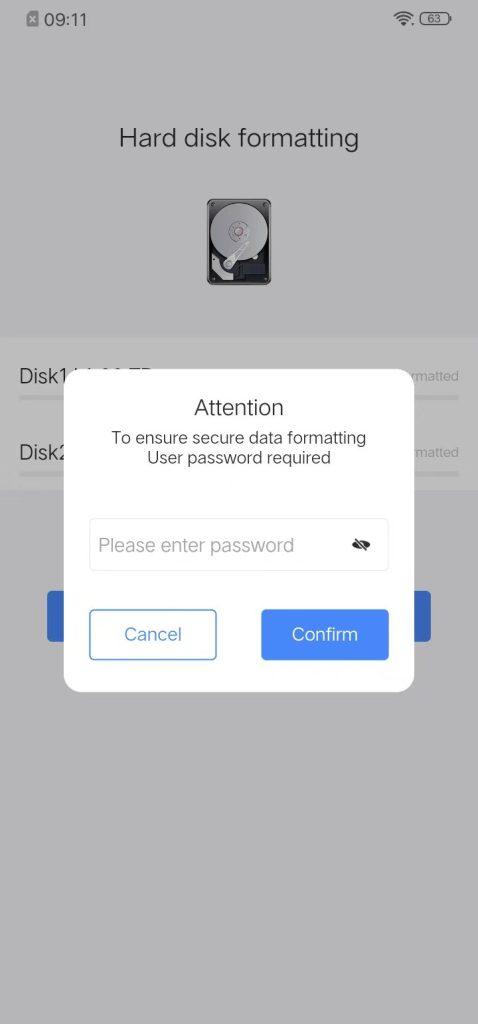
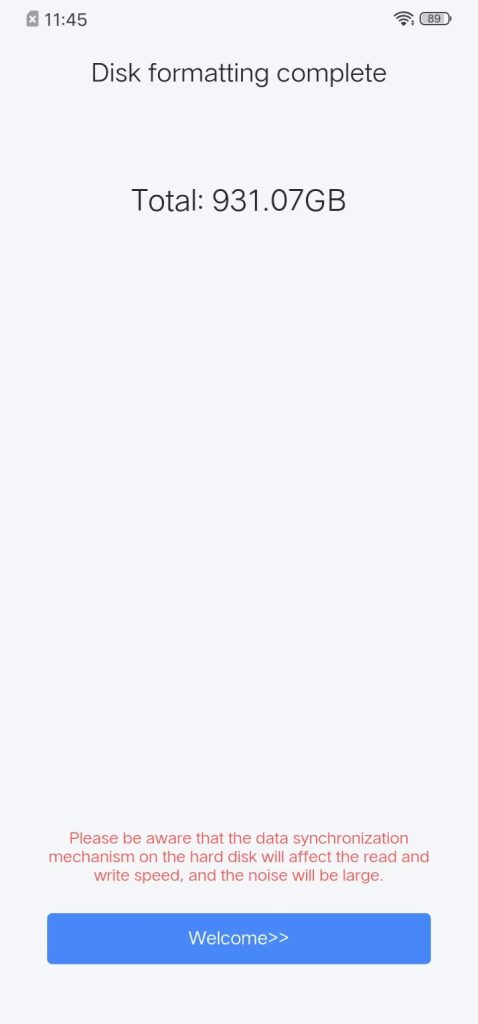
After entering the password, start formatting,when the hard disk formatting is completed, click “Welcome to Enter” to go to the main interface of the APP.
Note: After formatting, both the status light and the disk light remain green and constantly illuminated.


3.Email Registration #
Note: The user role for the first registration of the device is administrator.
Custom email, password and disk mode, for highersecurity users
- Before You Begin:
- To ensure a smooth setup experience, please make sure of the following:
- 1. Your device is powered on, connected to the internet, and has a hard drive properly installed.
- 2. Your mobile phone is connected to the same local network as the device.
Step 1: Locate Your Device on the Network
Device status: After the device is turned on (at this time, the status light/disk light is flashing slowly in red), open the APP and click “New Device Registration”.


Click “Next” to enter “The following devices are discovered”.
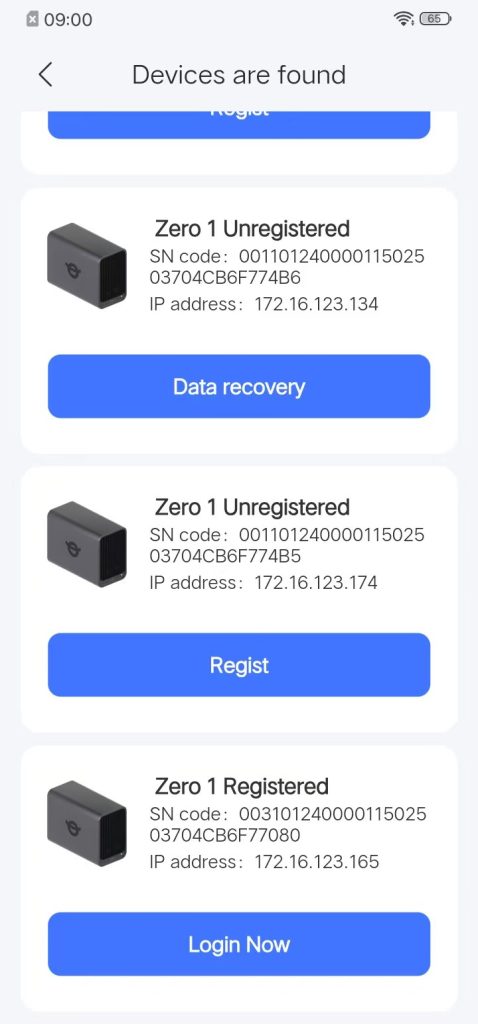
Note: Multiple devices are present on the local area network; please select the device that has not yet been registered.
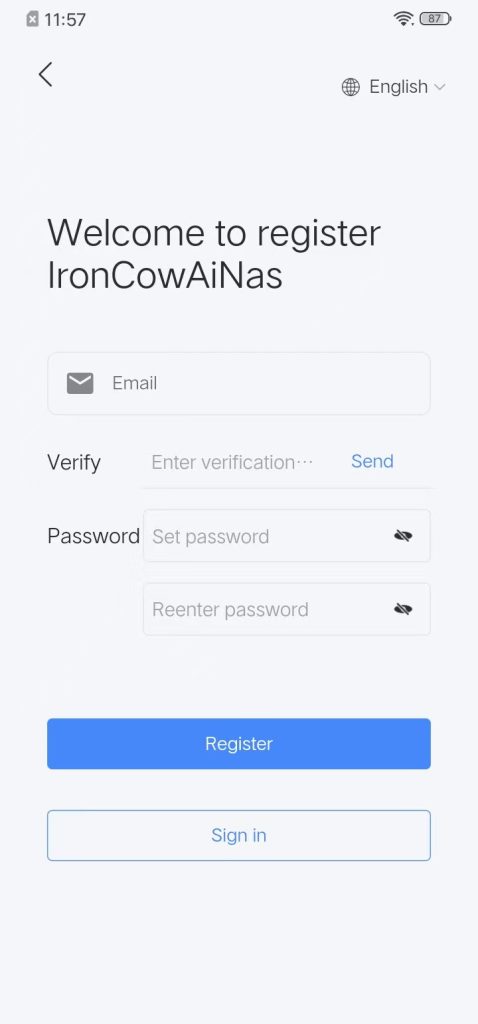
Step 2: Custom Email Registration #
Click “Custom Email Registration”

Enter your email, verification code and password, then click “Register”. A “Registration Successful” page will pop up.
Step 3: Create a storage pool #
Description:
Basic Mode: Users insert only one hard drive and this mode is the default. It does not support dual backup. If the hard drive fails, all data on it will be lost. The actual available capacity is 100% of the hard drive space.
Raid1 Mode: Requires two hard drives of the same capacity to be inserted. The two hard drives are mirrored and store exactly the same data in real time. The actual available capacity is only the size of a single hard drive (e.g., 2×4TB hard drives → total capacity 4TB).
DFS Mode: Requires two hard drives to be inserted, and their capacities can be different. DFS Explanation: Users can set “dual backup” for important directories in the APP. Only the directories set by the user for dual backup will be backed up. Compared to the full dual backup of Raid1 mode, DFS not only meets the security requirements for important data but also maximizes the utilization rate of hard drives.
Step 4: Format the hard disk #
Click “Start Formatting” to pop up the “Password Box”


After entering the password, start formatting,when the hard disk formatting is completed, click “Welcome to Enter” to go to the main interface of the APP.
Note: After formatting, both the status light and the disk light remain green and constantly illuminated.

4. Status and Disk Indicator Light Status Description #
| Name | Color | Pattern | Meaning / Firmware Description |
| Power LED | Off | — | Unit is powered off |
| Green | Solid | Powered on, registered, and online | |
| Green | Fast blink (3 Hz) | System firmware upgrade in progress | |
| Green | Slow blink (1 Hz) | Admin-password reset mode (hold RESET 4–5 s) | |
| Red | Fast blink (3 Hz) | Critical fault or factory-reset mode (RESET + POWER 5 s) | |
| Red | Slow blink (1 Hz) | Awaiting registration or network down | |
| Disk LED | Green | Solid | Normal operation |
| Green | Fast blink | Disk read/write activity | |
| Green | Slow blink | Disk hibernation | |
| Red | Slow blink | Formatting in progress (new disk or add/remove confirmation) | |
| Red | Solid | Disk needs attention (serious error) | |
| Red | Fast blink | Disk failure | |
| Off | — | No disk detected |
5. Troubleshooting Initialization Issues #
1. Possible Reasons for Not Receiving the Verification Code:
1.1 Signal and Message Interception: Ensure stable mobile signal reception and check the device’s spam or blocked message folder.
1.2 Number Accuracy: Verify that the mobile number entered in the NAS settings is correct, including the country code (e.g., +86 for China).
1.3 Carrier Restrictions: Contact your mobile service provider (e.g., China Mobile, China Unicom, or China Telecom) to confirm whether enterprise-sent SMS messages are being filtered or blocked.
1.4 Network Transmission Failure: A communication issue may exist between the server generating the verification code and the recipient mobile device.
2. Possible Causes of Hard Disk Recognition Failure:
2.1 Faulty Hard Disk: The drive may be defective. Test it on a Windows computer to verify system recognition.
2.2 Brand Compatibility: Certain hard disk brands may not be fully compatible with the device.
2.3 Loose Connection: The hard disk may not be securely seated. Power down the device and reinsert the drive firmly.
2.4 Uninitialized Drive: If the hard disk has not been initialized, it will not be mounted. Proceed with the disk formatting procedure.
2.5 File System Incompatibility: Supported data disk file systems include xfs, ext4, ext3, ext2, ntfs, and exfat. Ensure the disk uses one of these formats.
3. Network Connectivity Issues:
3.1 Slow Red Flashing Status Light: Indicates no network connection. Inspect the Ethernet cable connection and verify internet connectivity.
3.2 Steady Green Status Light but “Network Exception” Prompted in App: This may result from restrictive firewall policies within the enterprise network. Temporarily disable the firewall for diagnostic purposes. If connectivity is restored, adjust the firewall rules accordingly to permit access.
3.3 Local Access Available but No External Access: Confirm proper configuration of port forwarding rules on the router and verify the presence of a public IP address assigned to the network.
4. Possible reasons for not finding devices on the local area network
4.1 The mobile phone and the device are not in the same local area network.
4.2 The network port, network cable, and router are not correctly connected.
4.3 The device and the mobile phone are in two different subnets of the local area network.
4.4 The network to which the device is connected does not automatically assign IP addresses.
4.5 The newly connected device does not have network access permission (common in company office networks).


